Introduction to Contact interaction
Contact interaction is a fundamental aspect of finite element simulations, especially when modeling assemblies, frictional interfaces, and nonlinear behavior. Abaqus provides robust contact modeling capabilities, allowing users to define interactions with high precision. In this comprehensive guide, we will explore different types of contact interactions, their applications, common errors, and a step-by-step approach to setting them up correctly.

Step 1: Understanding Contact Types in Abaqus
Abaqus provides different types of contact interactions, each suited for specific applications:
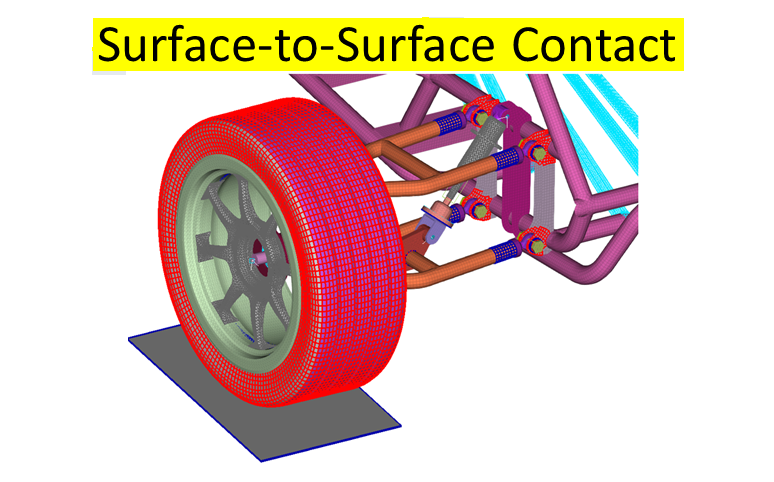
- Surface-to-Surface Contact
- Used when two distinct surfaces interact.
- Provides accurate results for large deformations.
- Example: Metal forming simulations where a punch interacts with a metal sheet.
- Node-to-Surface Contact
- Suitable when one surface has finer resolution compared to another.
- Used for beam-to-solid or shell-to-solid interactions.
- Example: A beam resting on a plate where the beam nodes act as the slave surface.
- General Contact
- Automatically detects interactions without explicitly defining pairs.
- Best for complex assemblies where multiple bodies interact.
- Example: Granular flow simulations where particles frequently collide.
Step 2: Defining Contact Pairs
- Open the Interaction Module:
- Switch to the Interaction module in Abaqus.
- Click Create Interaction and choose the appropriate contact type.
- Select Master and Slave Surfaces:
- Master Surface: The stiffer or coarser-mesh surface.
- Slave Surface: The softer or finer-mesh surface.
- Define Contact Properties:
- Normal Behavior: Hard Contact, Penalty Method, etc.
- Tangential Behavior: Friction (Coulomb model, frictionless, etc.).
Step 3: Adjusting Contact Parameters in Abaqus
- Hard Contact: Prevents penetration between surfaces.
- Penalty Contact: Allows controlled penetration by applying force proportional to the penetration depth.
- Friction Coefficients: Choose realistic values based on material properties (e.g., 0.3 for metal-on-metal).
Step 4: Common Errors, Causes, and Solutions
- Error: Overclosure of Contact Surfaces
- Cause: Initial penetration due to incorrect geometry alignment.
- Solution: Adjust initial positions or use the “Adjust” feature in Abaqus to correct surface overlap.
- Error: Contact Convergence Issues
- Cause: Poor mesh quality, high friction values, or inappropriate penalty settings.
- Solution: Refine the mesh near the contact regions, lower friction coefficients, or modify penalty parameters.
- Error: Excessive Element Distortion
- Cause: Inadequate contact constraints leading to unrealistic deformations.
- Solution: Apply appropriate stabilization techniques and use adaptive meshing.
- Error: Contact Not Detected
- Cause: Incorrect master/slave selection or missing interaction definition.
- Solution: Check the assigned surfaces and ensure proper interaction settings are defined.
Step 5: Running and Validating the Simulation
- Assign appropriate boundary conditions and loads.
- Run the Job Module and monitor results.
- Check contact pressure distributions in the Visualization module.
- Refine settings if necessary to ensure realistic results.
Step 6: Example Applications of Contact Interactions
- Sheet Metal Forming
- Contact interaction between die, punch, and blank.
- Uses surface-to-surface contact with a penalty method for realistic deformations.
- Bolted Joint Analysis
- Simulates tightening of bolts and pressure distribution.
- Uses general contact with friction to prevent sliding.
- Tire-Road Interaction
- Models rolling contact with frictional effects.
- Uses node-to-surface contact to capture grip and slip behavior.
Additional Learning in contact modeling in Abaqus
- Abaqus Documentation on Contact Modeling
- Understanding Finite Element Contact Mechanics
- Common FEM Simulation Challenges
Conclusion
Setting up contact interactions correctly in Abaqus is crucial for accurate FEM simulations. By selecting the appropriate contact type, defining accurate contact properties, and refining meshes, you can improve simulation accuracy and efficiency.
Our FEM Simulation Consulting team is here to assist! Contact Us today.

